

How to Add Other Items Stock in Phoneo
This tutorial explains how to add other items stock in Phoneo Seller CRM, a mobile shop management software built for mobile retailers. In this video, you will learn how to add accessories and other non-phone items into Phoneo stock, including headphones, earphones, neckbands, chargers, glass guards, and back covers. Phoneo allows mobile shop owners to manage accessory stock separately from mobile phones, making it easy to track quantity, purchase price, selling price, and available stock in real time. This tutorial is useful for mobile shop owners who sell mobile accessories and want a simple system to manage daily stock movement, reduce stock mismatch, and avoid manual register entries. The video also explains best practices for managing accessory inventory, including maintaining accurate stock levels, preparing items for billing, and tracking sales performance. Phoneo Seller CRM helps mobile retailers manage mobile phones, accessories, billing, customer records, and daily sales reports from one centralized dashboard. This tutorial is ideal for mobile phone shops and retail stores that sell accessories such as headphones, earphones, chargers, glass guards, neckbands, and back covers. Tutorial Type: Inventory Management Topic: Add Other Items / Accessories Stock Item Category: Mobile Accessories and Non-IMEI Items Software Category: Mobile Shop Management CRM Target Users: Mobile Shop Owners, Retail Staff Business Use Case: Accessory stock tracking and billing readiness. How to add accessories stock Mobile accessory inventory management Add headphones earphones stock Charger glass guard back cover stock Phoneo other items stock Mobile shop CRM for accessories Inventory management for mobile shop Phoneo Seller CRM tutorial, other item, charger, headphones, cover, earphone, glass guard, usb,earbuds.
Other Items / Accessories Purchase – Step-by-Step Guide
Use this guide to add other items or accessories (charger, earphone, cover, etc.) into your stock in a clean and well-categorized way.
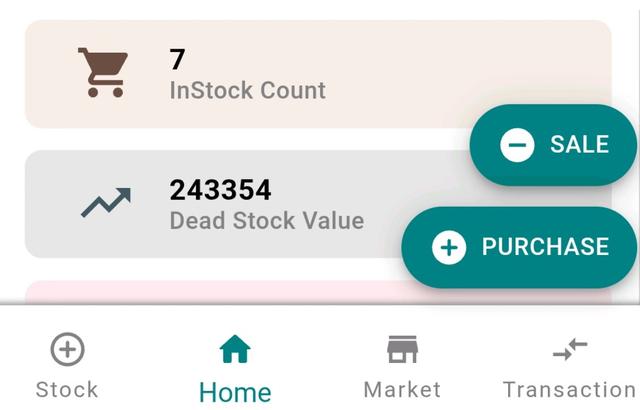
Step 1: Start a New Purchase
- 1.Open the app and go to the Home page.
- 2.Tap Purchase.
Step 2: Add Party Details (Optional)
- 1.Enter Customer Name or Mobile Number.
- 2.Choose whether the party is a Customer or Vendor.
- 3.If you want, you can skip this step and continue.
Step 3: Select Item Type
From the available options, select Other Item.
Step 4: Create a Category (Recommended)
Categories help you keep accessories organized and make stock audits easier.
- 1.Tap Add Category.
- 2.Enter the Category Name (Example: Charger, Earphone, Cover, Glass Guard)
- 3.Add a Category Description.
Step 5: Add Category Thumbnail (Optional)
- 1.Tap the Thumbnail icon at the top-right of the category box.
- 2.Choose how you want to add the image:
- Camera – take a photo directly
- Files / Gallery – select an existing image
- 3.Rotate or adjust the image if needed.
- 4.Tap Save.
Step 6: Save the Category
- 1.Tap Save.
- 2.Your category is now created and ready to use.
Step 7: Select Company / Brand
- 1.Enter the Company Name.
- 2.You can search and select from the list or enter it manually.
Step 8: Select or Enter Model
- 1.Select the Model Name if available.
- 2.You can skip the model or enter it manually.
- 3.Tap Next.
Step 9: Enter Purchase Amount and Margin
- 1.Enter the Purchase Amount (price you bought the item for).
- 2.Enter the Margin (your expected profit while selling).
Step 10: Add Item Image (Optional)
Turn ON the Image toggle if you want to add a product image, then tap Next.
Step 11: Add Multiple Units (Optional)
Tap Add Unit to add more quantity of the same item. You can repeat this as many times as required.
Step 12: Add IMEI / SN / WSN Details (Optional)
- Use Scan IMEI or Manual Entry.
- If the item supports dual IMEI, enter both numbers.
- You can also add SN / WSN numbers.
- Each unit can have different numbers.
- If not required, you can skip this step.
Step 13: Final Save
After adding all units, tap Save. Your accessory stock will be added successfully.
Step 14: View Added Stock
Go to the Stock page → open the Other tab to view all accessories.
Step 15: View Stock Details
Tap any Stock Card to view complete stock details.
Step 16: Add More Stock in the Same Category
Tap Add Stock to quickly add more items under the same category.
Final Note
Using categories keeps your accessory stock clean, organized, and audit-friendly. It reduces confusion and makes stock management faster and more reliable.